
Tuesday, October 25, 2011
Hanging Basket
Today I installed a post I made for hanging baskets. I had been working on this the last month or so when I had time and finally put it up. I am on hold with other projects, I need to save up some funds, need to do railings for the upper deck, some foundation work and then the Garage. Oh and this photo is from my new phone.

Sunday, September 4, 2011

Saturday, September 3, 2011
Windows
I finally decided to paint the windows. I was going to leave them white, but I knew they would look good in black. They are vinyl retro-fit windows which were replaced before me. Originally I was going to trim out the window craftsmen style with nice cedar trim, but the way the vinyl overlays the siding, adding cedar to it and screwing through the vinyl did not make any sense. So I painted them black. I used Behr Slate All in one paint, good for wood, cement and vinyl. I still need to do a 2nd coat and go back and touch up the main color, that won't take long.

I also have one side of the new fascia boards done, the other side with the power lines is next, and a little more challenging...


 |
| Back in April |

Thursday, September 1, 2011
Upper Rear Deck
I finally finished painting the outside of the house, just a few details left, trim windows and fascia. I have replaced 2 of 4 fascia boards so far, it is not easy to do, lucky my friend Tom is helping me do the ladder work. You have to de-nail the old board, use it as a template for the new board, pre-nail the new board, lift it in place and hammer it home. The next board we do has electrical wires attached to it, so we need to secure the power lines before we replace the fascia board, we will need to be careful on that day!!
I started work on the upper rear deck, I took out the stairs and removed the railings. The stairs are gone for good, since this will eventually be a bedroom deck. Next I need to custom order a 2x12x24 cedar fascia for the deck, then make my posts, add railing and balusters. My budget is $1200 for the railings. It will look pretty cool when I am done.


I started work on the upper rear deck, I took out the stairs and removed the railings. The stairs are gone for good, since this will eventually be a bedroom deck. Next I need to custom order a 2x12x24 cedar fascia for the deck, then make my posts, add railing and balusters. My budget is $1200 for the railings. It will look pretty cool when I am done.


Friday, August 19, 2011
Painted Fence
I painted my fence the other day, it was time. You should wait about six months before painting a new fence so it can dry out and set. I tried using a sprayer but I did not like the quality, so I got out my 4" brush and painted it by hand, it took just over half a day. I used Behr DP 391 Cedar Solid Stain


 |
| Installed in March |
Wednesday, July 27, 2011
New Playground
Honestly doing this playground a second time around really sucked. I put so much time and effort into the one at my last house, I just did not have the same enthusiasm this time and it seems I have less to work with. I did what I could, I just need to add some swings somewhere.
 |
| New playground, their homemade sign, slide, ladder, flag and seats. |
 |
| Playground and pool |
 |
| This was the old playground I built, custom swings, platform, slide, ladder, flag and slide pole, monkey bars, trapeze, and cargo net |
 |
| Custom sign I made - Gavin + Riley |
New Paint
Time for an update. I am half way done painting the house, it is a fair amount of work considering I am doing it all by brush. When done, I have new fascia boards ready to install, then I will be painting the fence. I work on it all when I can and when the weather permits. Of course all this work includes, crack filling, sanding, scraping, power-washing and so on. It is a great way to get to know your house. I am using Behr All in One Paint and Primer, Medium Base, Ext Flat ECC18-1 Quail Ridge
 |
| Front of the house |
 |
| Side chimney view |
 |
| New trees are doing well |
 |
| Surprising how well this area filled in. |
 |
| Just added that wood around the meter, it is insulated and has a rubber seal. |
 |
| This area used to be the neighborhood dump. |
Monday, April 11, 2011
New Trees
Last week I planted 40 new trees, most along my new fence line, some along the cedar fence to provide future hot tub privacy and block the view of the neighbors shed, and a few on city property, up on the easement area just to add some character. I did not know this for all my trees I had planted in the past, but when planting them, you should be cutting the root ball or shaving the root ball slightly on 3 or 4 sides so that the roots can spread and grow easier when you plant and not stay stuck in a round planter shape.


Friday, April 1, 2011
Fustrated
Bats, bugs, so many problems, doing a full reno can be more headache than it is worth. People keep telling me I am crazy and I should have just bought something that was already finished, or even to tear it down and build new. So last week, after the bats in the attic, I made the call. I hired a demo crew and in one day they tore the house down and removed all the debris. Done, so easy, now I can start fresh and new with no problems!!
 |
| House is gone |
Thursday, March 24, 2011
Bugs and Bats
So I have been up in the attic a few times of late. I have bugs up there and I don't want any more. They are cocoon like mud nests, I think a type of wasp. None are alive, it is just a ton of mud coccon's at each end of the house, which means I have cracks. I went up in the attic and decided to pick up as many cacoons as possible, I filled up two bags worth on one side of the house. Also I spray foamed the cracks from inside the attic, basically where the siding meets the soffit on the gable ends of the house have a quarter inch crack reveal allowing bugs and wasps to get in. I could see that spray foam was not the best method for this, so I only did the one side of the house attic.


I decided to caulk the cracks from the outside, so out I went and cut away all my excess spray foam and caulked away. This will all be painted soon enough.
So off I went to the other side of the house, where I did not venture into that side of the attic. This side also has the chimney and the same gaps and even larger. So right away I noticed bat Guano and stain marks on the white siding where the bats had been entering and exiting. This is a larger gap, half inch or so, between the chimney and siding. So I caulked everything but those gaps and decided because there was no backing I needed to go back into the attic and add some wood support for filler.
Mask, hat gloves, flashlight, tools and wood, back up I go. I get all the way to the other side of the attic and find the large gap area, it is tight, so i get crouched down and worked my way to the wall. I pulled back the tar paper to reveal the crack area and there in my face is two bats hanging upside down and screeching at me. I froze and they froze, we chatted for a bit and I told them I would be right back. I got out of there and came right back with a plastic Animal Crackers cookie jar. Armed and ready, I went back up there, got close to them and put the jar on the wall trapping them, they were pissed, screeching and flapping their wings, and they would not let go. I managed to get the lid on and had a look around, one whole wall cavity was full of Guano. Guano can be toxic and considered a bio hazard, so best to leave it untouched. I plan on removing all my insulation at some point and will remove the Guano and bugs at the same time.


I put some holes in the lid and put them outside. Bats will come back unless you are 100% positive you have sealed up your house and there is no way inside. Hard to do for sure sometimes. I read they will try for days and days to get back in, and even if you drive a few hundred miles away they will find there way.
I decided to glue corner round into the large gap areas and then caulk the area. This worked perfect. It sounds simple, but the whole job took me a few days.
My insulation is only 2" thick and I am going to remove it all when I re-do the hosue wiring. At that time I will be adding new batten insulation to a R value of 50 which is a few layers for sure. This means I need vents between each roof truss. So I bought 50 of them today and it means another day up there, not sure when, stapling each one to the roof.
Friday, March 18, 2011
Revised Deck Drawing
This is the revised deck drawing. Basically the firepit, seating area is now in the middle and the spa tub is off to the side.


Wednesday, March 16, 2011
New Deck
This is a concept drawing of the back deck. I am changing it around a bit, but the idea is there. Basically, it will have a covered area for sitting or a BBQ station, a swim spa tub and a gas fire pit seating area. The garage door you can see in the picture is a fourth bay door at the back of the garage, this is to get the tractor out, and have an open door to the backyard when I am working in the garage.


Wednesday, March 9, 2011
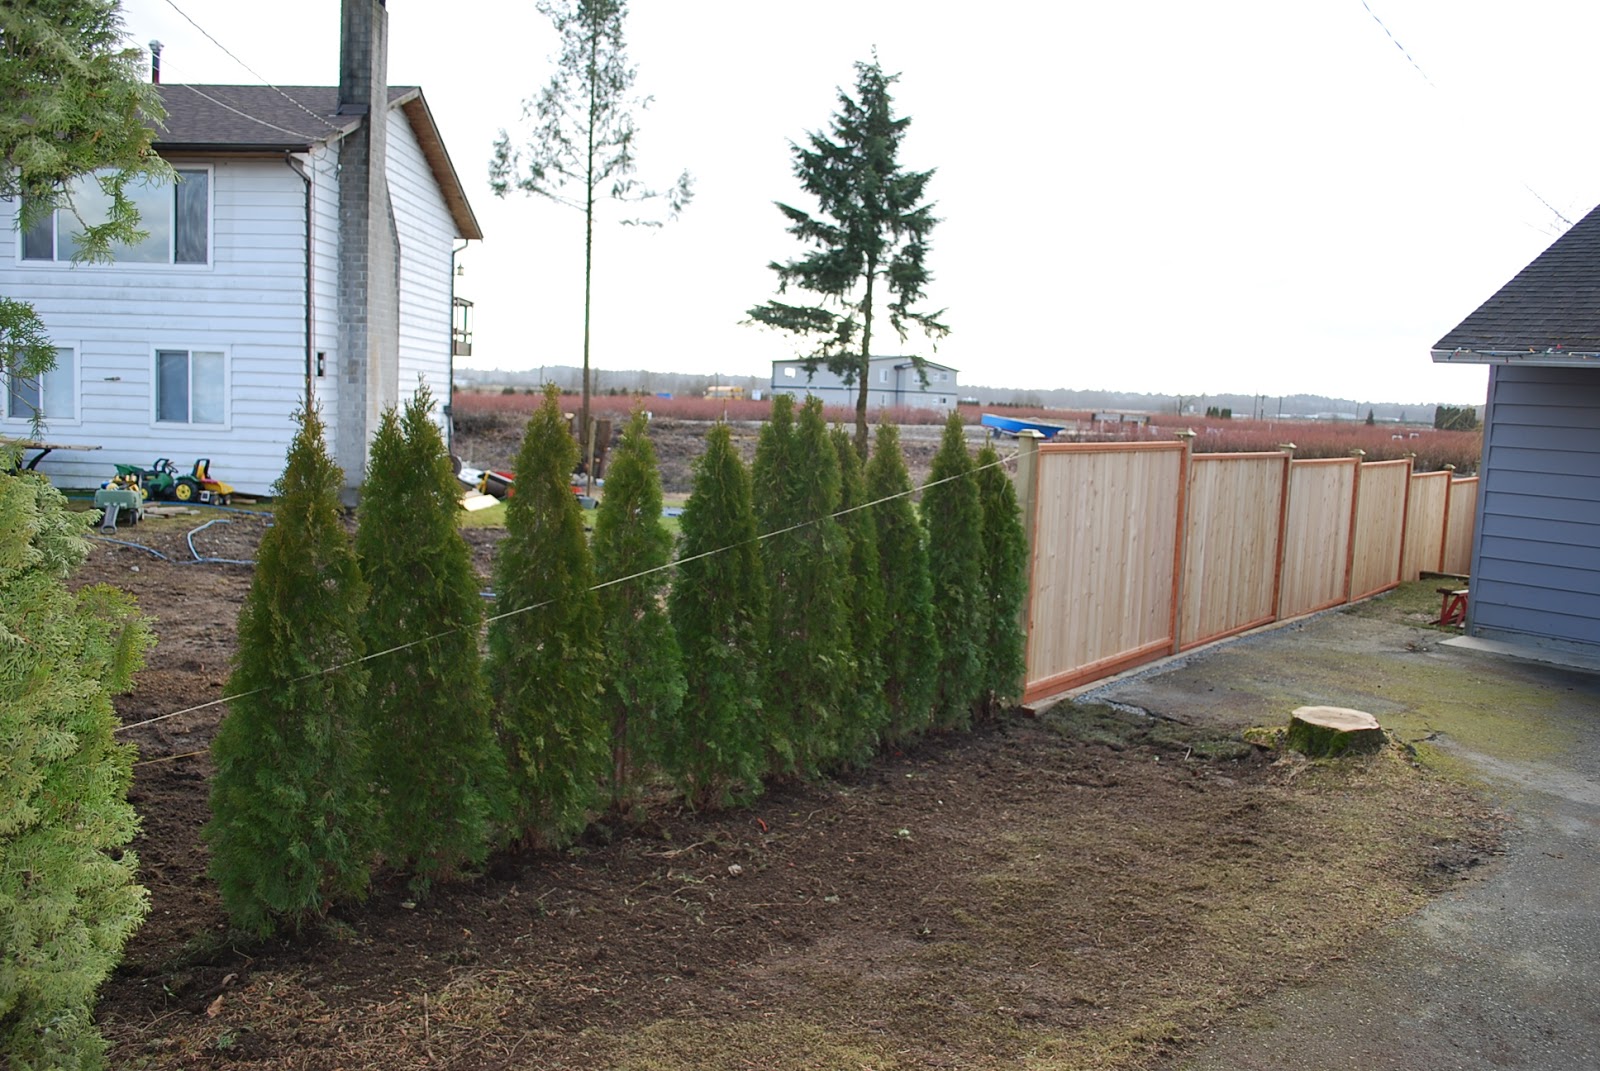
Emerald Green Cedars
Wow, what a ton of work to get a fence done and a row of cedars. It has actually been non stop for me since removing all my trees, just trying to get my yard back in shape has been a real challenge and the mud makes it all that much harder.
So the neighbors line is now done, I can move on to the other fence and finish clearing the yard and leveling it. Today I purchased and installed 10 Emerald Green Cedars from a farm that I goto once in the while called "Never Say Die Nursery". In fact I purchased 100 Western Red Cedars from them for my old property. Fe was so nice to me today, she gave my a dozen free range eggs, jam for my boys and a jar of her delicious pickles. I still need more trees for my other fence line, probably about 40 Excelsa Cedars and maybe a few more Emeralds, you can guess where I will be purchasing from.
Today finally stopped raining as I was planting my new cedars, I dug a light trench and then a small pit for each root ball as I went along. The whole area was kind of dug out as I had removed two tree stumps from that area so I really needed some fill. I went to Meadows Landscape and filled my trailer three times with free used dirt. This is the dirt that they take from people that do not want it, it is free and perfect for what I need. Half of the dirt I got today was from grow-ops, really nice dirt, even had some plants in there too. So three yards later I had all the balls packed nicely with fresh dirt and strings on both sides of the Emeralds in case it gets windy, which it will.


 |
| This is what it looked like last week. |
Monday, March 7, 2011
115 Foot Cedar Fence
I decided to replace the fence between myself and my neighbor. Since I had the excavator rental, now was the time to do it. I ripped out the old fence, cement balls, and railroad ties with the excavator. Once the line was clear I recruited my friend Steve for help. I had all the materials delivered and we got started right away. We set our string line and began at the back, post, panel, post, panel and so on. With all the previous work I had done ripping out the old fence and then we had rain and snow, we were working in pure mud, which makes everything twice as hard. Your boots hold pounds of mud, your tools get dirty, and so on. The second day, Steve recruited his friend Aaron to help us. We finished the majority of the fence that day and went for a nice lunch at a nearby pub. I let a few days go by so the ground would firm up a bit, and today I removed all the supports, finished the neighbors panel and gate, cut all the posts and put caps on. Just a note, I use a 2" reveal for my caps and mark two lines on the post with my square. Using my very sharp chainsaw, I cut the posts perfectly and easily. Then I pre-drill two holes in all the caps, then glue and screw 'em.


Sunday, February 27, 2011
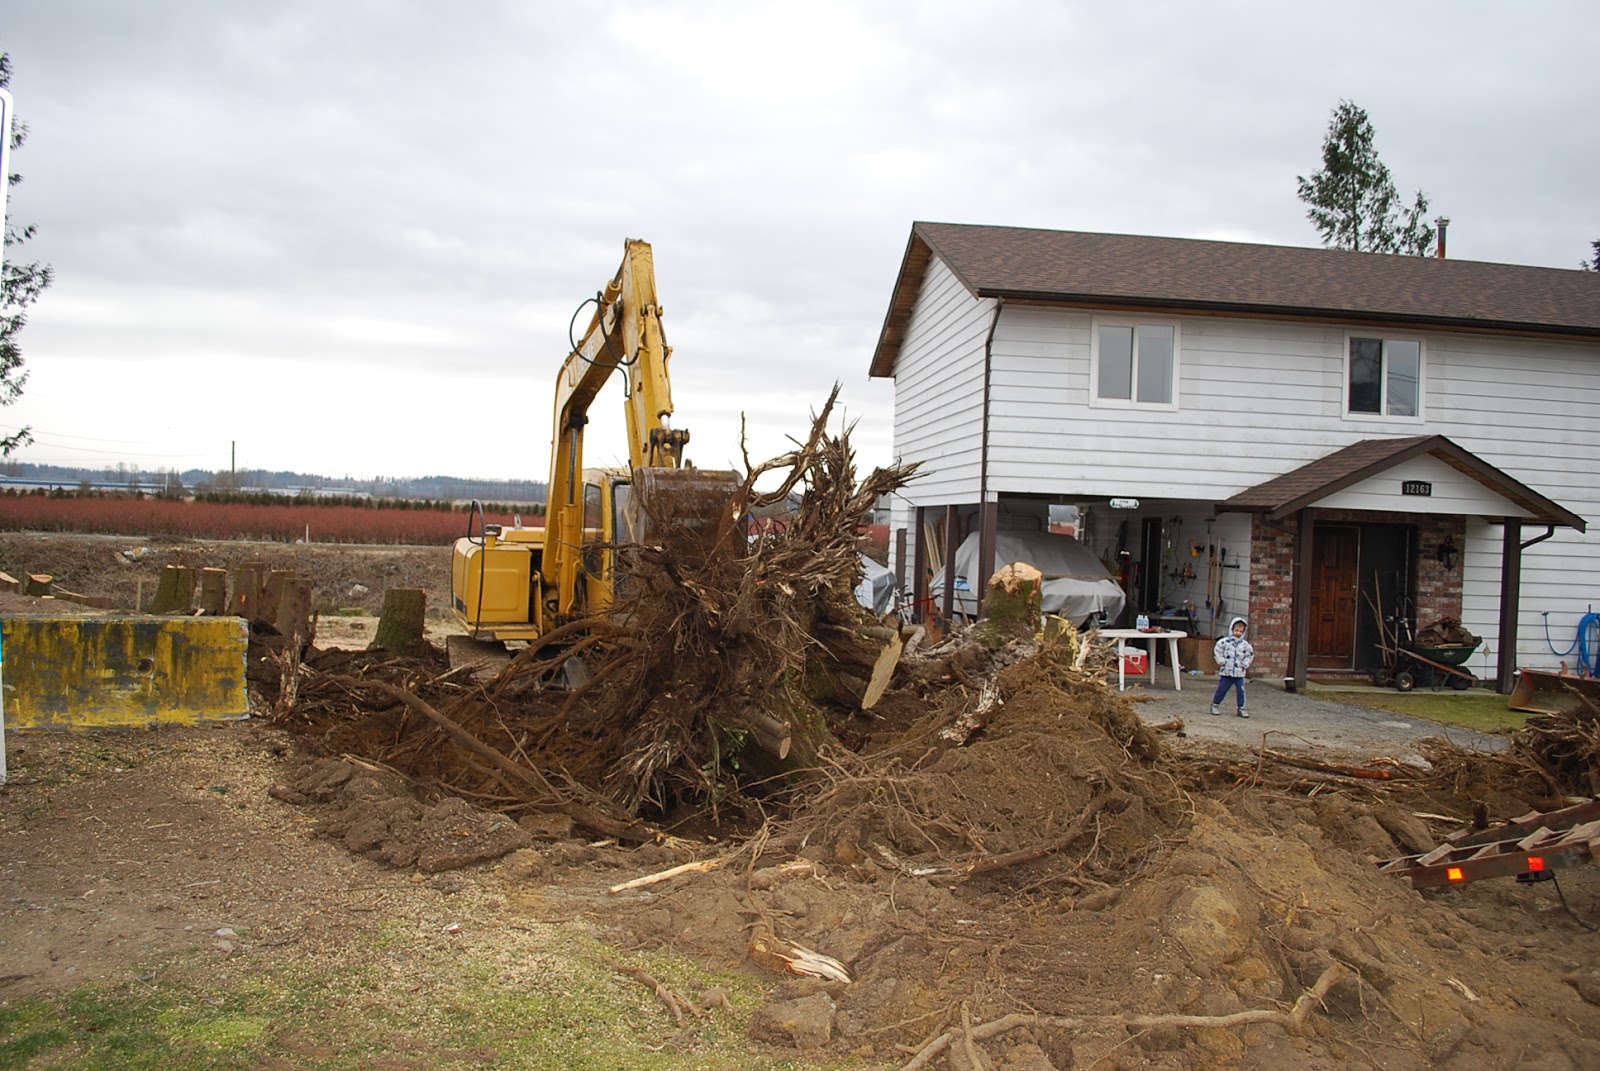
Stump Removal
I have a huge job of removing all the stumps so I can complete my fence line, new trees and prep for a new garage. I rented an excavator from Single Source Rentals and it arrived Friday at 8am, by 8:30, I knew I did not have a big enough machine to do the job. I called Sheldon who runs a Deere 80 excavator and is a pro, he came out Saturday and finished all the really big stumps. I still worked all day Friday pulling all the stumps I could and prepping for Saturday. I also rented a dump bin which we filled up on Saturday and have a second one coming Monday am. I also got a load of free fill delivered Friday am, well I had to pay for delivery. On Saturday I ripped out the neighbors fence and railroad ties with the excavator. The fence I put in the bin, but the railroad ties I had to take to the dump. I also ripped out each cement ball for each fence post, today I tried to load one into my truck with the excavator and I smashed the window of my canopy and crushed my tailgate, woops, need a few more hours on that machine, haha.
All the stumps are out and the ground is fairly level now. Monday I will finish putting the stumps in the bin, return the excavator, have the bins picked up and my new fence is being dropped off. I had a crew coming on Monday to help me install the fence, but now we have 3 inches of snow, so I will wait till it is gone and warms up a bit.


All the stumps are out and the ground is fairly level now. Monday I will finish putting the stumps in the bin, return the excavator, have the bins picked up and my new fence is being dropped off. I had a crew coming on Monday to help me install the fence, but now we have 3 inches of snow, so I will wait till it is gone and warms up a bit.


Subscribe to:
Posts (Atom)